| Version 73 (modified by olha, 16 years ago) (diff) |
|---|
Plone Google Sitemaps

Plone Google Sitemaps (quintagroup.plonegooglesitemaps, former qPloneGoogleSitemaps) is a Plone product developed by Quintagroup that allows you to enable different kinds of Google Sitemaps on your Plone website. Such Sitemaps help Google to identify site URLs and the data under each site section. With Google Sitemaps enabled, search engines could track the URLs faster and more efficiently, optimizing their search by placing all the information on one page. More about Why create Sitemaps for Google.
Links
- Home page - http://quintagroup.com/services/plone-development/products/google-sitemaps
- Repository - http://svn.quintagroup.com/products/quintagroup.plonegooglesitemaps/
- Releases - http://plone.org/products/qplonegooglesitemaps/releases
- Watch Plone Google Sitemaps Screencast to learn how to install and configure sitemaps on your Plone instance, how to let Google know about your sitemaps.
Introduction
Plone Google Sitemaps allows you to make your Plone site Google Sitemaps enabled. You can enable the following sitemap types on your website:
- content sitemap - is a list of the pages on your website. Creating and submitting a Sitemap helps make sure that Google knows about all the pages on your site, including URLs that may not be discoverable by Google's normal crawling process.
- mobile sitemap - is a specific type of Sitemap, that indexes all site URLs that serve content for mobile devices. By submitting such Sitemap into Google mobile index, you expand the coverage of the mobile web and speed up the discovery and addition of pages to Google mobile index.
- news sitemap - is different from regular Sitemaps, it is specific to Google News only. It uses the Sitemap protocol, with additional News-specific tags, defined by Google. The package brings additional Google Sitempas tab to News Item content type for defining NewsSitemap-specific meta tags.
Different Sitemap types index their content and are independent from each other.
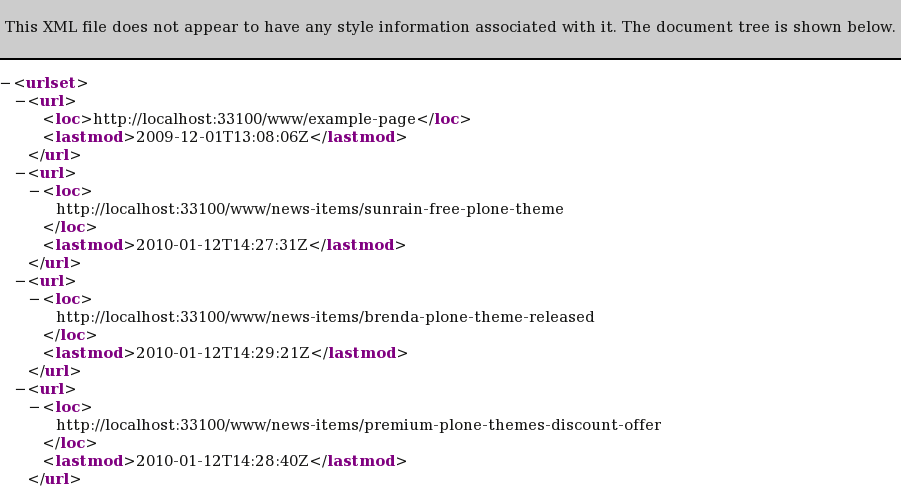
Google Sitemap looks approximately this way:
Installation
See Instatallation instructions for different product versions.
Migration
See migration instructions for migrating from previous quintagroup.plonegooglesitemaps package version to the new one; and from Products.qPloneGoogleSitemaps to quintagroup.plonegooglesitemaps.
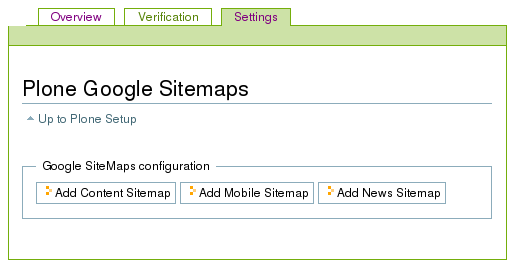
Configuration
Here is description of the Google Sitemap Configuration area (can be reached after successful Plone Google Sitemaps installation at Add-ons Configuraion -> Google Sitemaps).
Usage
Step 1 - Create Sitemap
Add Sitemap(s) at Google Sitemap Settings tab (Add-on Products Configuration -> Google Sitemaps). You can add any of the Sitemap types: content, mobile or news.
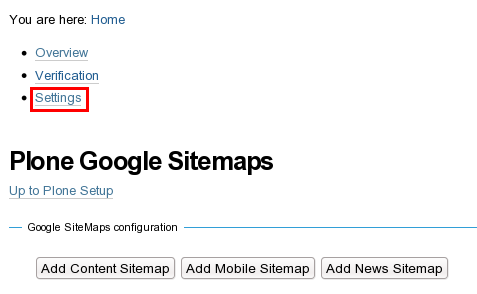
Define what content should be added to the sitemap by setting necessary parameters on Sitemap Edit Form.
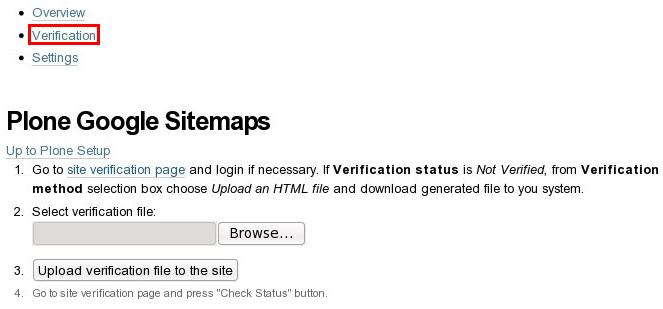
Step 2 - Verify your Site ownership in Google Webmaster tools
- Sign into Google Sitemaps with your Google Account
- Add your Plone site to your Google account, e.g. http://www.plone-site.com

- Verify your ownership by carrying out one of the suggested verification methods: uploading an HTML file with a name they specify, or adding a META tag to your site's index file. We recommend you to choose Upload an HTML file method as it is the most convenient and not so time-consuming as the second one.
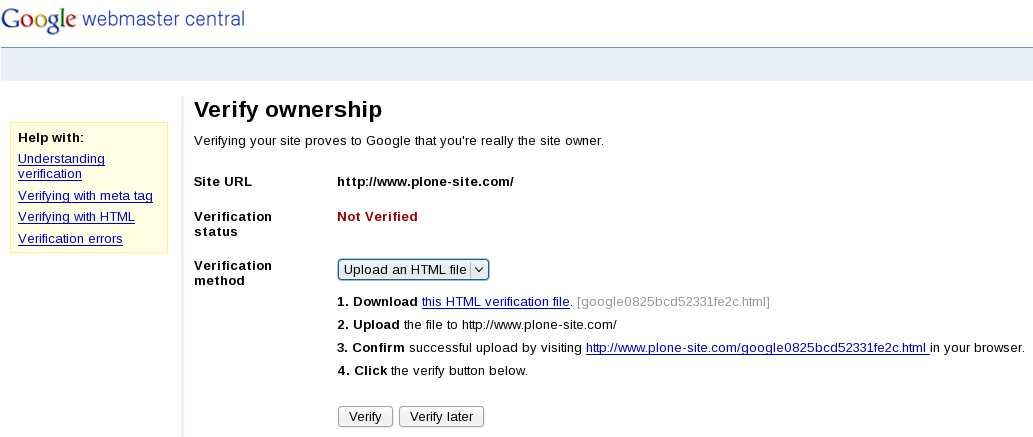
- Download the verification file
- Go to your Plone Site Setup -> Add-on Product Configuration -> Google Sitemaps
- Select the Verification tab
- Upload the verification file in the field provided
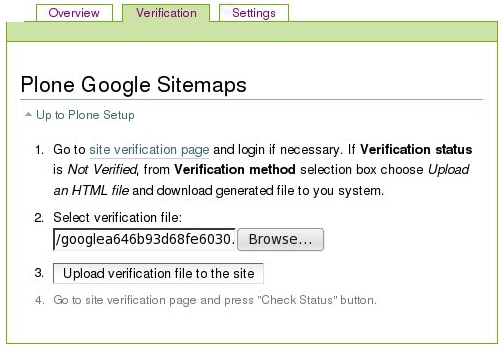
- Go back to Google's site verification page and press "Check Status"
- Google will verify that the file exists in the specified location. If it does, it'll show a status of VERIFIED and provide a link to your site statistics. You can view your statistics at any time after your site is verified by clicking the site link on the My Sites page.
If Google can't access the file, it'll give you information about the error it encountered. Once this problem is resolved, try to verify your site again.
Step 3 - Let Google know about your Sitemap
After verification is completed:
- Navigate to Site Configuration -> Sitemaps
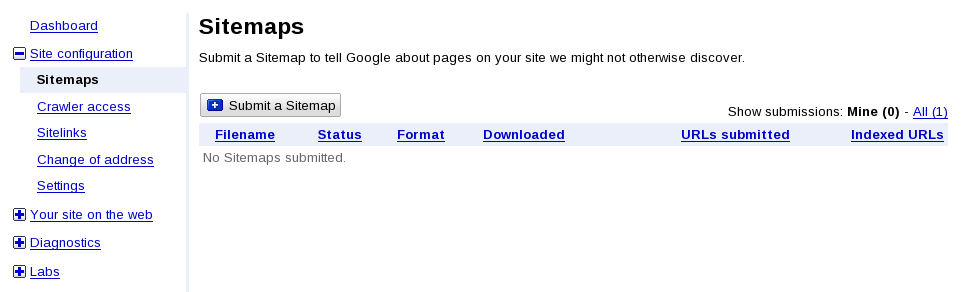
- Click the Submit a Sitemap button
- Type the URL to your Sitemap location in the provided field. Make sure you include the entire URL, such as http://www.plone-site.com/google-sitemaps
- Click Submit Sitemap".
- After you added a Sitemap, its status is displayed as Pending. Once Google processes your Sitemap (which may take several hours), this status will change to either OK or to an error. If you receive an error, click on it to view additional information.
FAQs
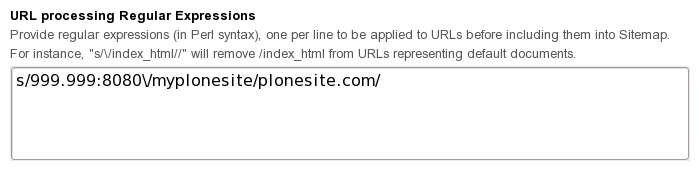
Question 1: Why the generated sitemap.xml displays URLs with the IP address like this: 999.999.999.999:8080/myplonesite instead of the URL www.plonesite.com?
Answer 1: quintagroup.plonegooglesitemaps uses 'canonical_url' catalog metadata field while building the sitemap.xml. You might get wrong values cataloged when creating sitemap through internal URL. To fix this - login to your Plone site via your site's real URL (www.plonesite.com) and update portal_catalog to fix the cataloged values.
Attachments (10)
- add-site.png (24.4 KB) - added by olha 16 years ago.
- verify.png (45.8 KB) - added by olha 16 years ago.
- submit-sitemap.png (26.9 KB) - added by olha 16 years ago.
- content-sitemap.png (44.4 KB) - added by olha 16 years ago.
- add-newssitemap.png (11.1 KB) - added by olha 16 years ago.
- upload-file.jpeg (77.4 KB) - added by olha 16 years ago.
- quintagroup.plonegooglesitemaps-160-120.jpg (19.6 KB) - added by olha 16 years ago.
- add-sitemap.png (15.5 KB) - added by olha 16 years ago.
- upload-file-plone4.jpeg (25.6 KB) - added by olha 16 years ago.
- url-processing1.png (15.0 KB) - added by olha 15 years ago.
Download all attachments as: .zip