| Version 54 (modified by olha, 16 years ago) (diff) |
|---|
Plone Google Sitemaps (quintagroup.plonegooglesitemaps, qPloneGoogleSitemaps)
Plone Google Sitemaps is a Plone product developed by Quintagroup that allows you to enable different kinds of Google Sitemaps on your Plone website. Such Sitemaps help Google to identify site URLs and the data under each site section. With Google Sitemaps enabled, search engines could track the URLs faster and more efficiently, optimizing their search by placing all the information on one page. More about Why create Sitemaps for Google.
Links
- Home page - http://quintagroup.com/services/plone-development/products/google-sitemaps
- Repository - http://svn.quintagroup.com/products/quintagroup.plonegooglesitemaps/
- Releases - http://plone.org/products/qplonegooglesitemaps/releases
- Watch Plone Google Sitemeps Screencast to learn how to install and configure sitemaps on your Plone instance, how to let Google know about your sitemaps.
Introduction
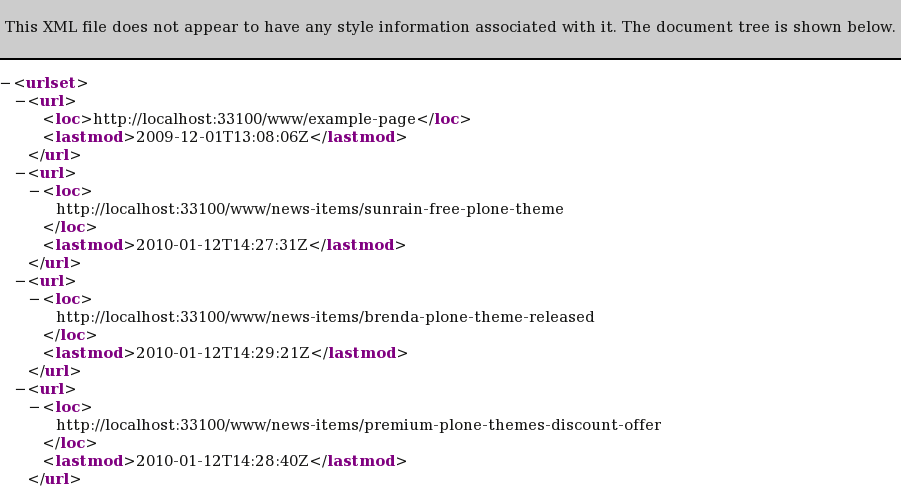
Plone Google Sitemaps allows you to make your Plone site Google Sitemaps enabled. Plone Google Sitemaps allows creating Sitemaps for Google which will look approximately this way:
You can enable the following sitemap types on your website:
- content sitemap - is a list of the pages on your website. Creating and submitting a Sitemap helps make sure that Google knows about all the pages on your site, including URLs that may not be discoverable by Google's normal crawling process.
- mobile sitemap - is a specific type of Sitemap, that indexes all site URLs that serve content for mobile devices. By submitting such Sitemap into Google mobile index, you expand the coverage of the mobile web and speed up the discovery and addition of pages to Google mobile index.
- news sitemap - is different from regular Sitemaps, it is specific to Google News only.
Different sitemap types index their content and are independent from each other.
Installation
Installing qPloneGoogleSitemaps product up to 0.8.5 version
qPloneGoogleSitemaps can be installed as old-type Plone product.
- Download product package archive from http://plone.org/products/qplonegooglesitemaps/ (e.g. 'qPloneGoogleSitemaps-0.8.5.tar.gz')
- Unpack it to get qPloneGoogleSitemaps folder.
- For buildout-based instance
- Put qPloneGoogleSitemaps folder into the products folder of your instance (this is a place for old-style Zope products to be added)
- Re-run buildout
- Restart Zope server
- For traditional instance
- Put qPloneGoogleSitemaps folder into the Products folder of your instance
- Restart Zope server
- Click on the link of the Site Setup in the top right corner of your Plone site
- choose Add/Remove? Products item in the Plone Configuration list
- select the product qPloneGoogleSitemaps among products available for installation
- press the install button below the table and make sure the product appeared in the right column of installed products
Installing quintagroup.plonegooglesitemaps package starting from 1.0 version
Buildout
To install quintagroup.plonegooglesitemaps to your buildout-based project:
- Add quintagroup.plonegooglesitemaps to the list of eggs to install:
    [buildout]
    ...
    eggs =
        ...
        quintagroup.plonegooglesitemaps
- Tell the plone.recipe.zope2instance recipe to install a ZCML slug:
    [instance]
    recipe = plone.recipe.zope2instance
    ...
    zcml =
        quintagroup.plonegooglesitemaps
- Re-run buildout, e.g. with:
$ ./bin/buildout
- Restart the Zope server, e.g with the following command in the terminal::
$ ./bin/instance restart
- Install Plone Google Sitemaps with Quickinstaller in Plone (Site Setup -> Add/Remove? Products)
Traditional Zope 2 instance
To install quintagroup.plonegooglesitemaps into the global Python environment (or a workingenv), using a traditional Zope 2 instance, you can do this:
- Copy quintagroup folder to your instance's /lib/python directory.
- Create a file called quintagroup.plonegooglesitemaps-configure.zcml in your instance's /etc/package-includes directory. The file should only contain this:
<include package="quintagroup.plonegooglesitemaps" />
- Restart the Zope server, for example with the following command in the terminal:
$ ./bin/zopectl restart
- Install Plone Google Sitemaps with Quickinstaller in Plone (Site Setup -> Add/Remove? Products)
Configuration
Here is description of the Google Sitemap Configuration area (can be reached after successful qPloneGoogleSitemaps installation at Add-on Products Configuarion -> Google Sitemaps).
“Overview” tab
Overview tab includes general information about Plone Google Sitemap product, and step-by-step explanation about how to get to work with it. A list of helpful recourses is also available here.

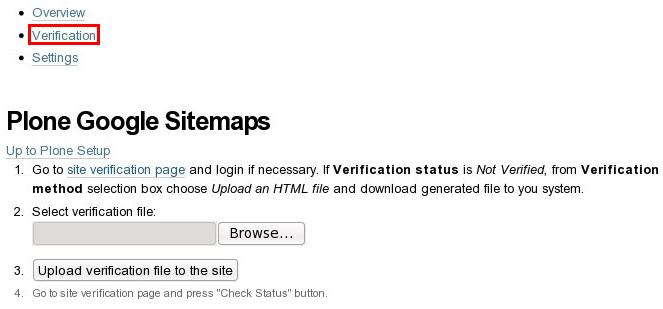
“Verification” tab
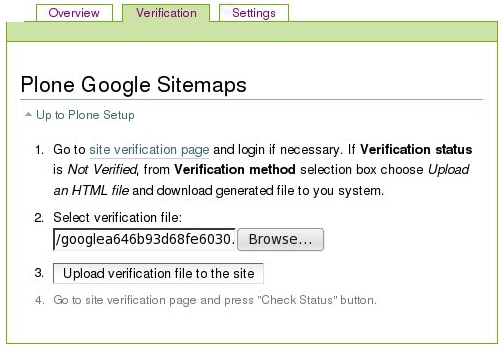
Use this tab while going through verification that you're the site owner on your Google account. Here you will be able to create verification file:
- copy the name of the verification file (e.g. google999999999999999.html) from Google Webmaster Tools
- Enter verification file name in the field provided
- Click on the button “Create verification file”
- Go back to Google site verification page and complete verification process
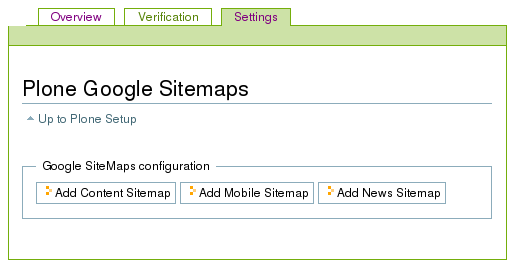
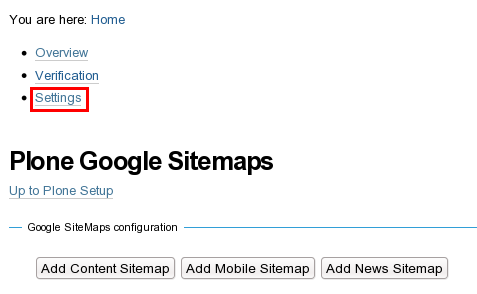
“Settings” tab
qPloneGoogleSitemaps enables different sitemaps to be generated on your web site. Here you will find some helpful information on how to create new sitemaps and manage them.
All available site sitemaps are listed here.
You can:
- Add New Sitemap - simple use appropriate button at the bottom of the page and you will be forwarded to the corresponding sitemap add form.
- Delete sitemap - select the sitemap's type you want to remove and press Delete.
- Ping desired sitemap: select sitemap type and push Ping button. By pressing "Ping" button you inform Google that it should reread your sitemap as you did some modification on the site. Google usually rereads your sitemap with it's own schedule but you have possibility to hint it about best time to do that. Below this button you have five workflow lists, which give you the opportunity to let Google know about the changes in your Plone site workflow.
- You can edit a sitemap by clicking on the necessary sitemap title and you will be lead to this sitemap edit form.
Edit sitemap
After clicking on add new sitemap button or on editing the existing one, you will be taken to the sitemap edit form.
On the edit form you can configure single sitemap and its pinging options:
- Short Name - give/change sitemap id (short name)
- Define the types - select meta types to be explored and to be displayed in a sitemap. (as a rule, Document is set as the default content type for the Plone Google Sitemap. However, it would be much better for the Google to see some other content types in your Plone Google Sitemap, like Folder or FormMailer).
- Review status - select the state of the objects to be visible in the sitemap.
- Blackout entries - objects with the given short names will be removed from the sitemap.
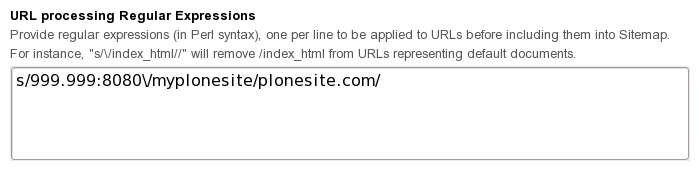
- URL processing Regular Expression - master regular expression in Perl syntax.
- Additional URLs - add URLs that are not objects to enable them to be shown even though their content type was not chosen in the field Define the types.
- Pinging workflow transitions - select workflow transitions for pinging Google on.
Note
It is essential to avoid the situation when there are two objects with the same content in the Sitemap, e.g. a folder and its default page. Various methods can be applied in such cases. One can either forbid ids of these objects by entering them in the field “Blackout entries” or make sure the default pages are not published unlike folders.
Usage
Step 1 - Create Sitemap
To enable Google Sitemaps on your site, add Sitemap(s) at Google Sitemap Settings tab (Add-on Products Configuarion -> Google Sitemaps). You can add any of the Sitemap types: content, mobile or news.
Step 2 - Verify your Site ownership in Google Webmaster tools
- Sign into Google Sitemaps with your Google Account
- Add your Plone site to your Google account, e.g. http://www.plone-site.com

- Verify your ownership by carrying out one of the suggested verification methods: uploading an HTML file with a name they specify, or adding a META tag to your site's index file. We recommend you to choose Upload an HTML file method as it is the most convenient and not so time-consuming as the second one.
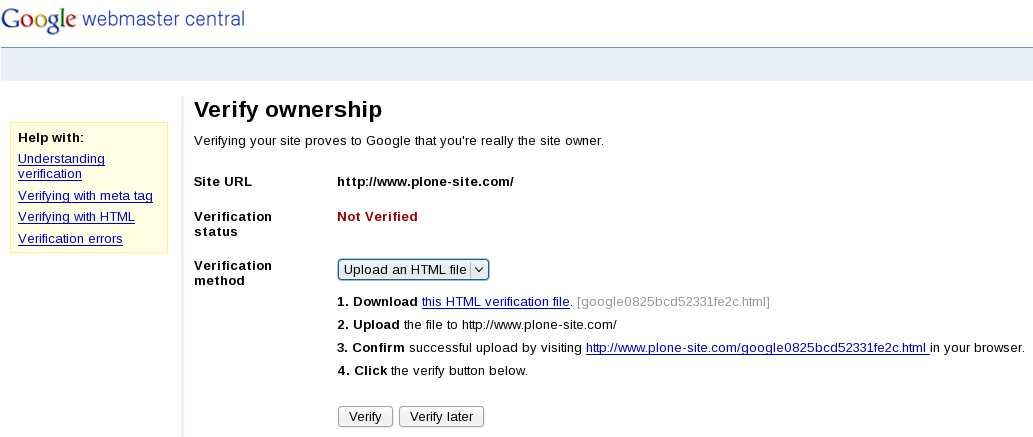
- Copy the name of the verification file specified below - google999999999999999.html
- Go to your Plone Site Setup -> Add-on Product Configuration -> Google Sitemaps
- Select the Verification tab
- Enter verification file name (similar to google999999999999999.html) in the field provided
- Click on the button Create verification file
- Go back to Google site verification page, indicate that you:
- created a file named google999999999999999.html
- uploaded the file to http://www.plone-site.com/ and can view http://www.plone-site.com/google999999999999999.html in the browser of Google.
- Click on the Verify button
- Google will verify that the file exists in the specified location. If it does, it'll show a status of VERIFIED and provide a link to your site statistics. You can view your statistics at any time after your site is verified by clicking the site link on the My Sites page.
If Google can't access the file, it'll give you information about the error it encountered. Once this problem is resolved, try to verify your site again.
Step 3 - Let Google know about your Sitemap
After verification is completed:
- Navigate to Site Configuration -> Sitemaps
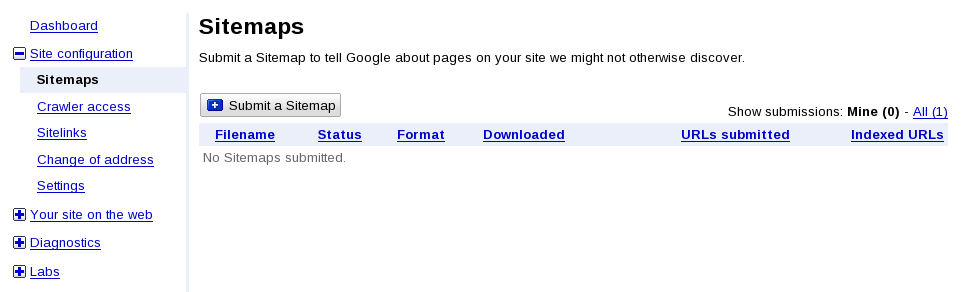
- Click the Submit a Sitemap button
- Type the URL to your Sitemap location in the provided field. Make sure you include the entire URL, such as http://www.plone-site.com/google-sitemaps
- Click Submit Sitemap".
- After you added a Sitemap, its status is displayed as Pending. Once Google processes your Sitemap (which may take several hours), this status will change to either OK or to an error. If you receive an error, click on it to view additional information.
Attachments (10)
- add-site.png (24.4 KB) - added by olha 16 years ago.
- verify.png (45.8 KB) - added by olha 16 years ago.
- submit-sitemap.png (26.9 KB) - added by olha 16 years ago.
- content-sitemap.png (44.4 KB) - added by olha 16 years ago.
- add-newssitemap.png (11.1 KB) - added by olha 16 years ago.
- upload-file.jpeg (77.4 KB) - added by olha 16 years ago.
- quintagroup.plonegooglesitemaps-160-120.jpg (19.6 KB) - added by olha 16 years ago.
- add-sitemap.png (15.5 KB) - added by olha 16 years ago.
- upload-file-plone4.jpeg (25.6 KB) - added by olha 16 years ago.
- url-processing1.png (15.0 KB) - added by olha 15 years ago.
Download all attachments as: .zip